MCTS to MCITP , 70-351 , 70-089 , 70-236 , 70-640 , 70-642 , 70-646 , 70-630 , 70-285 , 83-640: June 2010

Tuesday, June 22, 2010

Step by Step Backup of ISA Firewall Policy

One of the Most Crucial and Worth Taking part is of taking Routine Backups of ISA configuration
Such as he Firewall Policy, System Policy.
In this Step by Step Article I will teach you how to take Backup of Firewall Policy as a whole.You can also Take Individual Backup of a rule also.

Step 1
Open ISA Server Management and navigate to Firewall Policy, At the right most Top click on Tasks Pane.


Step 2
Slide down to “Related Tasks” and click Export Firewall Policy.


Step 3


Click Next , You will see a window which asks you if you want to make this rule password protected, check mark Export Confidential Information if needed and enter the Password. In my case I don’t want to make it password protected so I clicked Next.


Step 4


Browse and give a Path where  you want to save the .xml file.


Step 5


Click Next and Finish.


A message window appears confirming that you have successfully exported the configuration.


Verification:
Navigate to the Path and Confirm that there exists a file named “policy.xml”
Note:
You cannot import a rule from ISA Standard Edition to ISA Enterprise Edition and vice versa.

Cheers,

Himayat Ullah Khan.

Monday, June 21, 2010

Exchange 2010 Configuration for BlackBerry Enterprise Server 5.x

Below is the output generated, while configure the permission on Exchange Management Shell.

VERBOSE: Connected to HQDC-S-0003.ABC.COM.


[PS] C:\Windows\system32>Add-ADPermission -InheritedObjectType User -InheritanceType Descendents -ExtendedRights Send-As

 -User “BESAdmin” -Identity “CN=BES Admin NEW,CN=Users,DC=ABC,DC=COM”

Identity             User                 Deny  Inherited

——–             —-                 —-  ———

ABC.COM/Users/BES … MIS\BesAdmin=      False False

[PS] C:\Windows\system32>Get-MailboxDatabase | Add-ADPermission -User “BESAdminNew” -AccessRights ExtendedRight -Extende

dRights Receive-As, ms-Exch-Store-Admin

Identity             User                 Deny  Inherited

——–             —-                 —-  ———

Mailbox Database … ABC\BesAdmin     False False

Mailbox Database … ABC\BesAdmin      False False

[PS] C:\Windows\system32>Add-RoleGroupMember “View-Only Organization Management” -Member “BESAdmin”

[PS] C:\Windows\system32>Get-ThrottlingPolicy -Identity “BesPolicy”

RunspaceId                     : 373a9e2c-0641-4cc2-8911-7acd5cd70c7d

IsDefault                      : False

EASMaxConcurrency              : 10

EASPercentTimeInAD             :

EASPercentTimeInCAS            :

EASPercentTimeInMailboxRPC     :

EWSMaxConcurrency              : 10

EWSPercentTimeInAD             :

EWSPercentTimeInCAS            :

EWSPercentTimeInMailboxRPC     :

EWSMaxSubscriptions            :

EWSFastSearchTimeoutInSeconds  : 60

EWSFindCountLimit              :

IMAPMaxConcurrency             :

IMAPPercentTimeInAD            :

IMAPPercentTimeInCAS           :

IMAPPercentTimeInMailboxRPC    :

OWAMaxConcurrency              : 5

OWAPercentTimeInAD             :

OWAPercentTimeInCAS            :

OWAPercentTimeInMailboxRPC     :

POPMaxConcurrency              : 20

POPPercentTimeInAD             :

POPPercentTimeInCAS            :

POPPercentTimeInMailboxRPC     :

PowerShellMaxConcurrency       : 18

PowerShellMaxCmdlets           :

PowerShellMaxCmdletsTimePeriod :

ExchangeMaxCmdlets             :

PowerShellMaxCmdletQueueDepth  :

RCAMaxConcurrency              :

RCAPercentTimeInAD             :

RCAPercentTimeInCAS            :

RCAPercentTimeInMailboxRPC     :

MessageRateLimit               :

RecipientRateLimit             :

ForwardeeLimit                 :

CPUStartPercent                : 75

AdminDisplayName               :

ExchangeVersion                : 0.10 (14.0.100.0)

Name                           : BESPolicy

DistinguishedName              : CN=BESPolicy,CN=Global Settings,CN=MIS,CN=Microsoft Exchange,CN=Services,CN=Configuration,DC=ABC,DC=COM

Identity                       : BESPolicy

Guid                           : 7ce32dce-573d-4068-a542-e72a337d9119

ObjectCategory                 : ABC.COM/Configuration/Schema/ms-Exch-Throttling-Policy

ObjectClass                    : {top, msExchGenericPolicy, msExchThrottlingPolicy}

WhenChanged                    : 5/27/2010 2:14:40 PM

WhenCreated                    : 5/27/2010 2:13:55 PM

WhenChangedUTC                 : 5/27/2010 10:14:40 AM

WhenCreatedUTC                 : 5/27/2010 10:13:55 AM

OrganizationId                 :

OriginatingServer              : UAE-GNRL-S-0001.MIS.AE

IsValid                        : True

[PS] C:\Windows\system32>Set-Mailbox “BesAdmin” -ThrottlingPolicy “BESPolicy”

After Configuring the all above power shell commands, all you need to do some other configuration on SQL Server for adding the user account in the SQL LOGIN, for adding the DBCREATOR rights, and add the BESADMIN account in the LOCAL ADMINISTRATOR GROUP on the BLACKBERRY MEMBER SERVER.

Cheers!

Zahir Hussain Shah

How Microsoft Deployed / Implemented Exchange Server 2010 on their premises

A very interesting & recommended web cast, which every Microsoft / Exchange guy should watch, Mrs. Luisa Garcia, Microsoft IT Service Manager, is describing that how Microsoft transitioned his Messaging System to Exchange 2010.

Friday, June 18, 2010

Exchange 2007 Dumps (70-236)

Microsoft 70-236
TS:Configuring Exchange Server 2007
106 Q&A
Version 2.73
Important Note, Please Read Carefully
Other ExamInside products
Offline Testing engine
Use the offline Testing engine product to practice the questions in an exam environment.
Build a foundation of knowledge which will be useful also after passing the exam.

Download

Source : certexam.blogspot.com

Thursday, June 17, 2010

Step by Step Configuration to Block a Website

Step by Step Configuration of ISA to Block a Website

In order to Block a Website you first need to create a Block List and then use it in your ISA rule.
This Step by Step Configuration will help you to Solve your Problem.

First Create a Block List (URL Set) :


Open ISA Server Management , Click Firewall Policy , On Right Most Top you will see three Tabs namely Tools,Tasks and Help. Click on Tools Tab and Expand Network Objects
.


Right Click on URL Sets and click New Set, The Following windows opens, give it a name and enter the URL of website that u need to block.


A new URL Set is created, Click Apply to sace the Changes.


Now Click on Task Tab and Create a New Access Rule :


Click Next , then select Deny :


Click Next and Add the Following Protocols :


Click Next and now add the Source to which you need to apply the rule from ( in most cases its internal )


Click Next and Add External to the Destination List.


Click Next and add the users you need to apply this rule for. You can also Add users from you Domain but for that you need ISA to be a Part of that Domain. Click Next and Finish.
Click Apply to Save the Rule .


The rule must be on Top in order to Work Properly because ISA Access rule works the same as Access lists in Router. See the hightlight rule which is on Top named "Blocked Website".


Now we will check this Rule on a Client machine,  Open any browser and enter the Website Address i.e www.facebook.com and see what happens.User must get the following message.


Technical Information (for support personnel) 
Error Code: 502 Proxy Error. The ISA Server denied the specified Uniform Resource Locator (URL). (12202) 
IP Address: 172.16.0.1 
Date: 6/17/2010 5:50:17 AM [GMT] 
Server: isatest 
Source: proxy 


Note the Technical Information that tells you that the specified Address is denied by ISA.

Your Rule is now Created and No one can Access the Specifed Website.

Cheers,

Himayat Ullah Khan ( Cisco Certified Network Associate )

Wednesday, June 16, 2010

Creating an Access Rule in ISA 2006


Hi ,

ISA is a very powerful tool by Microsoft because it gives Administrators the ease of Monitoring,Restricting,Allowing,Alerts,Sessions,Bandwidth utilization,logging and lots more.
It also enables an Admin to allow Multiple Internal Hosts to Access to internat by NAT/PAT at its own. IT Admin dont need to do anything to configure.
Today i will show you how to make an acces rule in ISA 2006.
Its quite simple and it will be a piece of cake for you as i have prepared a snapshot Article for all of you.

Open ISA Server Managment :


Expand Array --> ServerName ( mine is isatest ) --> FireWall Policy ,
Click on Task Pane at the Right Most Top and Click Create Access Rule,
Give the Rule a Name ,


Click Next and Allow the Rule :


Click Next and Add the Protocols shown in SnapShot :


Click Next and Add the Source named Internal ( Internal is used for User inside a netwo , this feature describe the NAT/PAT feature as in Router) :


Click Next and Add Destination to External :


Click Next and Define which users you want to allow this Rule for ( In my case i have allowed all users ). This is the main Feature of this product that allows you to Restrict or allow Users.


Click Next and Finish :


Rule is created as it is highlighted but its not yet been active, You need to Apply in order to use this rule.
Click Apply Shown on Top.


As you Click Apply the Following Window will popup ensuring that u have successfully created the Rule.


Click OK.

Check your Browser and yeah Internet is running :)

Cheers.

Himayat Ullah Khan (Cisco Certified Network Associate)

Latest TestInside CCNA 640 802 11.73 773

Latest TestInside CCNA 640-802 version 11.73 with 773 Q/A
PiC.LEECH.iT - FREE iMAGE HOSTiNG

Download


No pass

Thanks

Source : certexam.blogspot.com

Latest TestInside CCNA 640 802 17.14 356 q/a

Update 18 May testinside ccna 17.14 with 356q/a
direct download
no pass

Link Download 

Thursday, June 10, 2010

Enable Security Log for Monitoring Logon

Securing Domain/system is a hot topic now a days and a challeging task for System Administrators.One of the most important issue is to keep track of the Users logon on Machine which enables Admins to keep track of Access to Permitted/Denied Users.
Windows Comes up with a great utility to Monitor such Tasks on Domain as well as on Local.
I have Prepared this Article for System Admins to Use this Excellent Utility.


Procedure :
First you need to enable the Security login in Administrative Tools ( Enabled by Default in Windows 2003 Server )

For Windows XP :
Open  Control Panel :


Click Administrative Tools :


Click Local Security Policy:


Under Local Policies click Audit Policy , then open audit account logon events


Check Mark the “Success” Event under Audit these Attempts ( You can Also check mark “Failure”)


Also u need to Check Mark “Audit Logon Events”


Check Mark the “Success” Event under Audit these Attempts ( You can Also check mark “Failure”)


For Windows Server 2003 :
Open Administrative Tools à Local Security Policy


Rest of the Procedure is the Same as Windows XP.

Verification :
Goto à Administative Tools à Event Viewer


Goto à Security à Success Audit


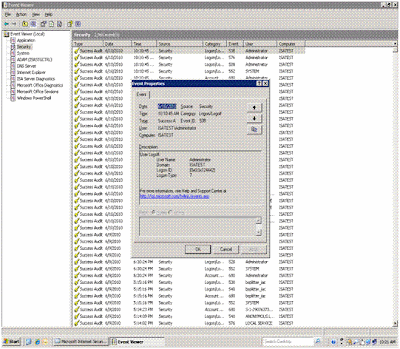
Check this Log Info for Verification :


Procedure is the Same for Windows XP.

User Login Information can be seen using the following path :
Goto Event Viewer and Browse Security :
Security Log Files Path : C:\WINDOWS\System32\config\SecEvent.Evt


Cheers !

Copyright : Himayat Ullah Khan


Wednesday, June 9, 2010

Restore Show Desktop Icon to Quick Launch on Taskbar

Problem :

The Show desktop icon is missing from your Quick Launch toolbar in Windows XP, but you want to use this icon instead of the alternative methods to show the desktop or show open windows.

To resolve this problem automatically in Windows XP, click the Fix this problem link. Then follow the steps to download and run Guided Help.

Fix this Automatically

Manual Fix

To re-create the Show desktop icon yourself, follow these steps:
Click Start, click Run, type notepad in the Open box, and then click OK.
Carefully copy and then paste the following text into the Notepad window:

[Shell]
Command=2
IconFile=explorer.exe,3
[Taskbar]
Command=ToggleDesktop

On the File menu, click Save As, and then save the file to your desktop as "Show desktop.scf". The Show desktop icon is created on your desktop.
Click and then drag the Show desktop icon to your Quick Launch toolbar.

Information for advanced users

The Quick Launch toolbar uses the files in the following folder:

%userprofile%\Application Data\Microsoft\Internet Explorer\Quick Launch
Back to the top

Alternative to using Show Desktop :

To quickly show the desktop or open windows without using the Show desktop icon on the Quick Launch toolbar, you can use one of the following methods:
Press the Windows logo key+D on your keyboard.
Right-click the Windows taskbar, and then click Show the Desktop or click Show Open

Source : http://support.microsoft.com/kb/190355

Migrate Windows Server 2003 DHCP Server to Windows Server 2008 R2 DHCP Server

Dear Readers,
Here I would like to mention those stpes, which you need to carry out for migrating the Windows Server 2003 based DHCP Server to Windows Server 2008 R2 based DHCP Services.
Step1:
Exporting existing DHCP Server backup using NETSH utility, which is recommended by Microsoft for migrating DHCP Server database in OS platforms.


Step 2:
Importing existing DHCP Server database backup using NETSH utility into the new Windows Server 2008 R2 DHCP Server:

Step3:
See in the below snpashot that our new Windows Server 2008 R2 has all the IP Address leases after this migration.


Step4:
After the successful migration of DHCP server database from Windows Server 2003 DHCP Server to Windows Server 2008 R2 DHCP Server,  we can also tunned the DHCP Server “Conflict Dectection Settings”, so after having this settings configured on our new DHCP Server (Windows Server 2008 R2), our new DHCP Server first ping the all scope’s available IP Addresses, for checking that weather this IP Address is alive in the NETWORK or not, if it is then DHCP Server wont give this IP address, and will move the next AVAILABLE IP ADDRESS.


I hope with this snapshot based article, now I would be a peice of cake to migrate your Windows Server 2003 based DHCP Server to Windows Server 2008 R2 based DHCP Services.


NOTE:
The great thing about this utility is that it also restores the IP ADDRESS LEASES, which your old DHCP Server given to clients
in past, you can see in the below snapshot in the new DHCP Server, we also got the previous given IP leases:

GAL Photos: Frequently Asked Questions

Earlier I posted about the new GAL Photos feature in Exchange 2010 and Outlook 2010. Since then, there have been many implementation-related questions internally and from customers.
Here are some FAQs

Q. Do I need Exchange 2010 to display GAL Photos?
A. As noted in the post, Active Directory has the thumbnailPhoto attribute. Outlook 2010 has the client-side feature to display the photo. Exchange 2010 provides the Import-RecipientDataProperty cmdlet to easily import the picture (yes, a GUI would’ve been nice – we hear ya!), and Exchange 2010′s Offline Address Book (OAB) has the ability to include the necessary pointers to AD to allow Cached Mode clients to display the picture – the client still needs to be able to communicate to AD to download the picture. You can make it work for Outlook 2010 clients without using Exchange 2010, but Cached Mode support is an Exchange 2010 + Outlook 2010 feature.

If you can write the code/script to upload the picture blob to AD (or find the script/code on the web), you can make it work with a previous version of Exchange. We recommend you treat all scripts/code downloaded from the web as untrusted code and test it thoroughly in a non-production environment.

Q. What are Active Directory requirements? Do I need Windows 2008 R2?
A. Windows 2008 R2 is not required. In fact, the thumbnailPhoto attribute has been around since Windows 2000.
- However, the mAPIID attribute should have the value 35998. This happens when domain controllers are running Windows 2008 or later, or if your Active Directory schema has been updated to Windows 2008. If not, you can run forestprep from Windows 2008 to update it. For details, check out Prepare a Windows 2000 or Windows Server 2003 Forest Schema for a Domain Controller That Runs Windows Server 2008 or Windows Server 2008 R2. In an environment with mutliple forests, you must update each forest that has users or Exchange servers.
- You must set the thumbnailPhoto attribute to replicate to the Global Catalog, as shown in the original post, although it’ll work without this modification in single domain environments.

Q. Is the thumbnail saved in my OAB?
A. No, by default it isn’t. As noted in the previous post, the Exchange 2010 OAB simply includes a pointer that the data exists in AD. You can modify it to include the photo blob in the OAB. We recommend testing it in a non-production environment to determine, depending on the number of users in your organization, whether you can support the resulting OAB size.

Q. How can I add the thumbnail to my OAB?
A. Remove the thumbnailPhoto attribute as an Indicator attribute from the OAB using the following code (also provided in the original post):

$attributes = (Get-OfflineAddressBook “Default Offline Address Book”).ConfiguredAttributes
$attributes.Remove(“thumbnailphoto,Indicator”)
Set-OfflineAddressBook “Default Offline Address Book” -ConfiguredAttributes $attributes

Add the attribute as a Value attribute:

$attributes.Add(“thumbnailphoto,Value”)
Set-OfflineAddressBook “Default Offline Address Book” -ConfiguredAttributes $attributes

Remember to update the OAB once you’re done uploading photos.

Update-OfflineAddressBook “Default Offline Address Book”

Q. Does Outlook 2010 cache the photos?
A. Outlook 2010 caches the photos for the session so it doesn’t pull the data from Active Directory again during that session. If Outlook 2010 doesn’t have Active Directory connectivity, and the thumbnailPhoto attribute isn’t included as a Value attribute in the Offline Address Book, it won’t display the thumbnail.

Q. Can Outlook 2007 display GAL photos?
A. No, Outlook 2007 displays photos for Contacts if the user has saved them. This is a client-side feature and no data is uploaded to AD. For details, see Add, change, or remove a picture for a contact.

Q. When users send an email to external recipients, are photos sent outside my organization?
A. No, the thumbnail photos are not sent with email. As indicated above, Outlook 2010 clients in your organization fetch the data from Active Directory (or the Offline Address Book, if you’ve modified the ConfiguredAttributes parameter for the OAB to include it as a value attribute). If your Active Directory is accessible to anonymous users from outside the organization, meet me at camera 2!

Zahir Hussain Shah

Source : http://www.zahirshah.tk

Application Virtualization (App-V) Video Series

Brief Description

Learn how to configure App-V; create, publish, and update virtual applications; and create and manage policies for virtual applications.

Download Here:

http://www.microsoft.com/downloads/details.aspx?displaylang=en&FamilyID=e0cca44a-f522-48c3-837f-85493b3734a9#filelist

How Live Migration Works in Hyper-V 2008 R2

The live migration process moves a running VM from the source physical host to a destination physical host as quickly as possible. A live migration is initiated by an administrator through one of the methods listed below. The speed of the process is partially dependent on the hardware used for the source and destination physical computers, as well as the network capacity.
Three methods can initiate a live migration:
1. Using the Failover Cluster Management console, an administrator can initiate a live migration.
2. If Virtual Machine Manager is managing physical hosts that are configured to support live migration, the Virtual Machine Manager administration-console can be used to initiate a live migration.
3. A WMI or PowerShell script can be used to initiate a live migration.
Any guest operating system supported by Hyper-V will work with the live migration process.
After initiating a live migration, the following process occurs:
1. Live migration setup
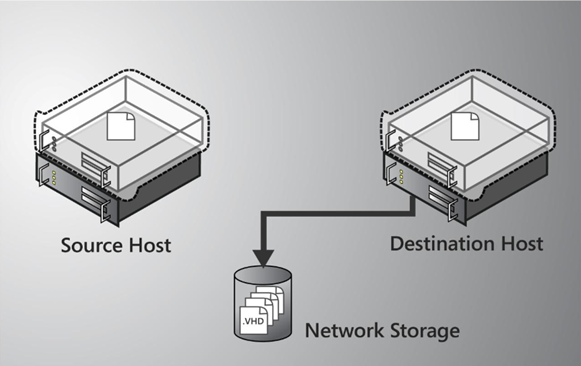
During the live migration setup stage , the source physical host creates a TCP connection with the destination physical host. This connection transfers the VM configuration data to the destination physical host. A skeleton VM is set up on the destination physical host and memory is allocated to the destination VM.

Stage 1: Live Migration Setup
2. Memory pages are transferred from the source node to the destination node
In the second stage of a live migration, the memory assigned to the migrating VM is copied over the network to the destination physical host. This memory is referred to as the working set of the migrating VM. A page of memory is 4 kilobytes.
For example, suppose that a VM named SERVER2 configured with 1024MB of RAM is migrating to another Hyper-V physical host. The entire 1024MB of RAM assigned to this VM is the working set of SERVER2. The utilized pages within the SERVER2 working set are copied to the destination Hyper-V physical computer.
In addition to copying the working set of SERVER2 to the destination physical host, Hyper-V on the source physical host monitors the pages in the working set for SERVER2. As memory pages are modified by SERVER2, they are tracked and marked as being modified. The list of modified pages is simply the list of memory pages SERVER2 has modified after the copy of its working set has begun.
During this phase of the migration, the migrating VM continues to run. Hyper-V iterates the memory copy process several times, each time a smaller number of modified pages will need to be copied to the destination physical computer.
After the working set is copied to the destination physical host, the next stage of the live migration begins.

Stage 2: Memory pages are transferred from the source node to the destination node
3. Memory pages transferred
Stage three is a memory copy process that duplicates the remaining modified memory pages for SERVER2 to the destination physical host. The source physical host transfers the register and device state of the VM to the destination physical host.
During this stage, the network bandwidth available between the source and destination physical hosts is critical to the speed of the live migration and using a 1 Gigabit Ethernet or faster is important. The faster the source physical host transfers the modified pages from the migrating VMs working set, the more quickly the live migration will complete.
The number of pages transferred in this stage is dictated by how actively the VM is accessing and modifying memory pages. The more modified pages, the longer the VM migration process takes for all pages to be transferred to the destination physical host.
After the modified memory pages are copied completely to the destination physical host, the destination physical host has an up-to-date working set for SERVER2. The working set for SERVER2 is present on the destination physical host in the exact state it was in when SERVER2 began the migration process.
Note: You can cancel the live migration process at any point before this stage of the migration.

Stage 3: Memory pages transferred
4. Move the storage handle from source to destination
During the fourth stage of a live migration, control of the storage associated with SERVER2, such as any VHD files or pass-through disks, is transferred to the destination physical host.

Stage 4: Storage Handle Moved
5. The VM is brought online on the destination server
In stage five of a live migration, the destination server now has the up-to-date working set for SERVER2 as well as access to any storage used by SERVER2. At this point SERVER2 is resumed.

Stage 5: VM Resumed
6. Network cleanup occurs
The migrated VM is running on the destination server in the final stage of a live migration. At this point a message is sent to the physical network switch causes it to re-learn the MAC addresses of the migrated VM so that network traffic to and from SERVER2 can use the correct switch port.

Source : www.zahirshah.tk

Allow Cross-Site POP3 and IMAP4 Client Connectivity


You can allow your POP3 and IMAP4 clients to connect to their mailbox from one site in your organization when their mailbox is located in a different site in your organization. This setting is not enabled by default. This feature can only be performed by using the Exchange Management Shell.
Looking for other management tasks related to ? Check out .
Use the Shell to enable or disable cross-site POP3 or IMAP4 client connectivity

This example enables cross-site IMAP4 connectivity:
IMAP


Set-IMAPSettings -AllowCrossSiteSessions
This example enables cross-site POP3 connectivity:
POP


Set-POPSettings -AllowCrossSiteSessions
Restart the IMAP4 service or the POP3 service. You must restart the service you are using to start the process of replicating this settings change to all of your domain controllers.

Hyper-V Videos and Webcasts

Exchange 2010 Beta Sp1

Download:
 http://www.microsoft.com/downloads/details.aspx?FamilyID=a0965fc9-2723-4947-ae6b-74bc3808e72a&displaylang=en